
Using AI to tag a Photo collection
As photographers pro, or amateur we often accumulate large collections of images that need proper organization. Manually tagging thousands of photos can be tedious and time-consuming. In this tutorial, I’ll show you how to use my own AI setup along with Python and the OpenAI API to automatically tag my photo collection.
The current flagship models from OpenAI or Anthropic not only allow text generation but also have the capability to work with given images. But not only these cloud based solutions can do this but also smaller local models, like Gemma 3 from Google or Mistral Small 3.1 offer this capability – and it works really surprisingly well. Given this, and the fact I have quite a large collection of photos (>80k) I thought I could use this to amend my photos with tags or keywords, a headline and a description for each photo. So, the simple requirements are as follows.
- For a given photo, leverage AI to get tags in German and English Language.
- Next this this get a headline for this photo. This is btw. something which also can be used to remain compliant to the upcoming EU accessibility acts.
- Also, generate a description for the photo.
- In order to save this data as compatible and interoperable as possible, the gathered information should be saved directly into the photo. The standard way for this is Exif, XMP and IPTC data.
- Do all of this recursively for a given directory
Outcome
Before I go into the details, let’s have a look to the result
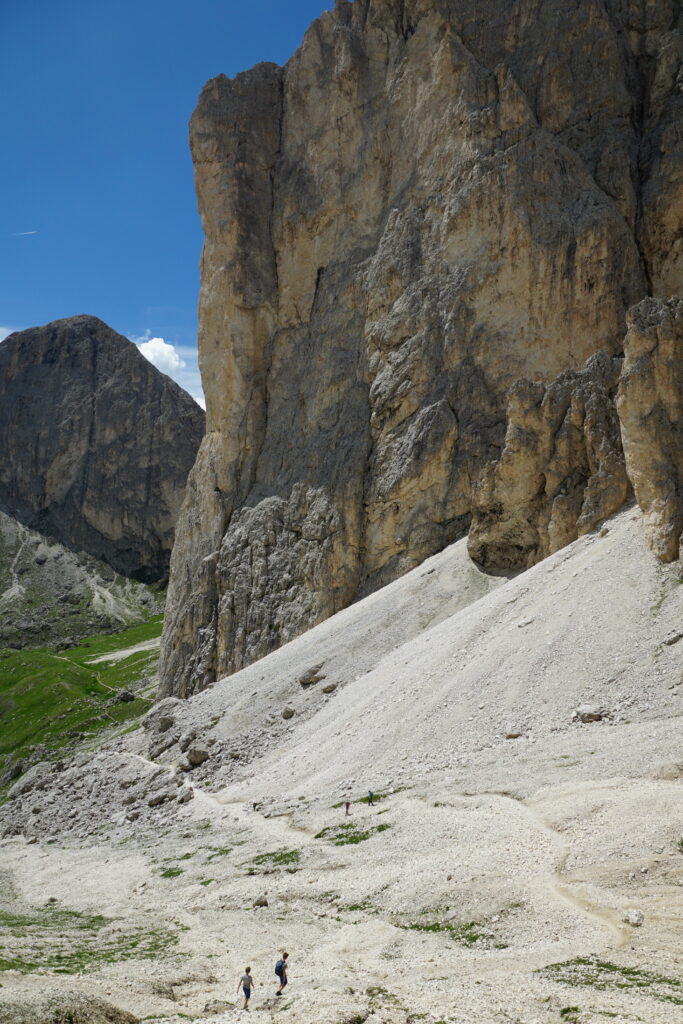
For this photo, the script will amend the EXIF, IPTC and XMP Daten with the following information:
Headline:
Scaling the Heights
Caption-Abstract:
A low-angle shot captures a towering rock face with a climber scaling its immense height. The composition emphasizes the scale of the cliff and the adventurous spirit of the activity, under a bright blue sky.
Keywords:
mountains, rock climbing, cliff, landscape, outdoor, adventure, Berglandschaft, Felsklettern, Klippe, Landschaft, im Freien, Abenteuer
Works well! Here are the main parts of the script. You will also find everything in this Gitjub repository
The main function to analyze an image is the process_image function. Unless the image already contains tags, it asks the LLM to analyze the image and return tags, headline, and description in JSON format. Afterwards, the JSON is parsed and the retrieved data is applied to the image using Exiftool.
def process_image(image_path:str, model:str, overwrite=False) -> None:
    logger.info(f"Processing image: {image_path}")
    PROMPT = """
        Analyze this image. Respond in json format with the following elements:
        5-10 tags in english language. Separate tags with commas.
        Append the same tags in german language to the list.
        a headline for the image
        a short abstract of the image
        Return the json object with the following keys:
        Example:
        {
        "tags": ["tag1", "tag2"],
        "headline": "headline",
        "abstract": "abstract"
        }
        Do not add any other text. Just respond with the json object.
        """

    try:
        with exiftool.ExifToolHelper() as helper:
            tags = helper.get_tags(image_path, tags=["XMP-dc:Subject", "IPTC:Keywords"])
            # Check if the image already has tags
            if tags and not overwrite \
                and ("XMP:Subject" in tags[0] or "IPTC:Keywords" in tags[0]):
                logger.info("Image already has tags. Skipping...")
            else:
                json_result = describe_image_by_model(image_path, PROMPT, model)
                result = parse_json_result(json_result)
                tags = result.get("tags", [])
                # remove leading and trailing whitespace from each tag
                tags = [tag.strip() for tag in tags]
                headline = result.get("headline", "").strip()
                abstract = result.get("abstract", "").strip()
                logger.debug(f"Tags: {tags}")
                logger.debug(f"Headline: {headline}")
                logger.debug(f"Abstract: {abstract}")
                # tags = generate_image_tags(jpg_image)
                helper.set_tags(image_path,
                    tags = {
                        "IPTC:Keywords": tags,
                        "XMP-dc:Subject": tags,
                        "IPTC:Writer-Editor": model,
                        "IPTC:Headline": headline,
                        "XMP-dc:Title": headline,
                        "EXIF:ImageDescription": headline,
                        "IPTC:Caption-Abstract": abstract,
                        "XMP-dc:Description": abstract
                    }, params=[]
                )
    except Exception as e:
        logger.error(f"ExifTool execution error: {str(e)}")
Usage
The easiest way of using this on you own is with Docker. I uploaded the respective image on Docker Hub:
docker run -v ./:/var/log \
    -v YOUR_PHOTO_DIR:/app/images \
    hulk66/photo-tagging python tagger.py \
    --ai_server YOUR_AI_SERVER \
    --api_key YOUR_API__KEY \
    --model YOUR_MODEL /app/images
Adjust YOUR_PHOTO_DIR, YOUR_AI_SERVER, and YOUR_API_KEY to your needs. Optionally, you can specify –overwrite to overwrite any existing tags, descriptions, and captions. Using –verbose, the log file will show you the generated response from the model. It then iterates recursively over the given directory and finds all jpg, jpeg, or heic files. The latter ones will be temporarily converted into jpg as the models can work with jpg (and png, I believe) only.
Currently it is running on my place, takes a decent amount of time.
latest: Pulling from hulk66/photo-tagging
8a628cdd7ccc: Already exists
6cca951a45d1: Pull complete
b3b4f30c6749: Pull complete
e9ddbe7a005f: Pull complete
f2284c6ab730: Pull complete
acee0987ed20: Pull complete
b28f9ed3ee2c: Pull complete
e621d349f2e5: Pull complete
Digest: sha256:c1281754dd976d131c3e4d0bdbccb264225a7f7c4ed6718b5f86d8223a4dfd4e
Status: Downloaded newer image for hulk66/photo-tagging:latest
Processing images...:   8%|▊         | 6342/79694 [23:24:03<233:11:36, 11.44s/it]